Closed Cell Pad In Z-Rest Configuration
Submitted By Brawny
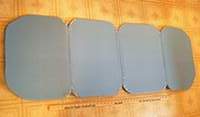
The $6 closed cell pad is comfortable enough, but sometimes it's just bulky or stays too curled for easy use. I wanted an accordion type pad, like the Z-rest, but didn't want to pay $30 plus shipping.
This pad, shown in the photo, is 56 inches long and weighs 8.75 ounces (yard-stick included for size reference). I made it by dividing the desired length into 4 equal sections of 14 inches each. I measured 14 inches from one end, and using a razor knife, scored the pad. I did not cut all the way through. Then, in order to have it fold back, I turned it over, and measured 14 inches from the scored mark, and scored it again. Then I turned it back to the original side, measured the last 14-inch section, and scored it again.
I used postal wrapping tape to reinforce both front and back sides of the pad where it was scored. This pad will be inserted into my silnylon backpack to form the frame. I rounded the corners of each section, which gives it the scalloped look. This helps the pack to have a more rounded shape, lowers the pad's weight by about an ounce, and should not affect its insulating value.
After testing it this summer on the CDT, I will report back on how well it held up.
LED Mini-Lights
Ackerman's LED light (homemade)
Information originally provided by Dan Akerman, John Rennison, Dean Anderson, Ron Schmidt, Stuart Bilby, Larry Lief, James Gibling & Jim Craven
Materials: (for details and sources, see below)
LED: 5 or 10mm diameter LED with rated intensity of 3000mcd or more. Because I've been approaching this project with my night sight in mind I've just been
testing red LED's, but there are several other color options.
3V lithium watch battery: just a basic watch battery.
Electrical tape: classic black tape for electrical work.
Stiff wire or small paper clip: for making a key ring/lanyard attachment loop.
Synthetic string for lanyard: anything that will fit through the attachment loop you make later and won't get in the way of whatever use you have in mind.
Silicone sealant: sometimes called aquarium sealant, 100% silicone, silicone sealer, etc. It just needs to be a sealant that dries to a fairly stiff rubbery gel.
[optional] Plasti-Dip: This is a product for giving things such as screwdriver
handles a tough rubbery coating.
Assembly:
1. Hold the battery between the LED leads and as close to the head as possible. Pinch the leads against the battery to make sure it works, as the LED only works in one direction. If it doesn't light up, flip the battery over.
2. Bend the excess lengths of both leads back on themselves to form an umbrella-handle curve and tape the negative one to the battery with a small strip of tape. Cover the lead well but leave part of the battery visible. Put enough tape on the positive battery face to cover the 1/3 closest to
the LED head and the 1/3 farthest away. Now the lead only touches the battery's
middle when it's pressed in contact with the face - like a switch!
4. Bend the positive lead so the middle part curves away from the battery when the end of the lead is taped in place. Put a strip of tape loosely over the length of the lead, sealing the contact area without holding the switch 'on'.
5. If you would like a key ring loop/lanyard attachment point, bend the paper clip into a loop with a waist that rests over the switch and arms that hook the front of the battery on either side of the LED. If the illustration doesn't show this clearly enough, use your imagination: how can you make a tiny loop of wire that will be a secure attachment point for the light even before the loop is fully glued on? 4. Now, encapsulate: hang the light by your wire loop or, if you choose to omit the loop, clamp the head somehow, and smear silicone in a 1/16"-1/8" thick layer all over and around the battery/lead part. Add a little extra as a sort of reinforcing neck around the LED head's base.
5. Let it dry, tie it too a lanyard or put it with your keys, and then be the envy of just about everyone on the planet!
It's fun: the thing bounces when you drop it!
Alternative Encapsulation Method #1: From John Rennison.
Instead of smearing silicone all over the battery, you can just mask the LED and dip the whole thing into Plasti-Dip. Nice idea, John! It works well alone or even over the silicone. You'll need a couple of coats, so hold in such a way as to allow you to hang it for drying, and read the directions on the can about how long to wait between coats, etc. The advantage here is a smoother, more evenly distributed coating. The disadvantage is stiffness: if you apply too many coats, the Plasti-Dip might be too stiff to allow you to push the switch.
Alternative Encapsulation Method #2: From Dean Anderson.
I tried making a couple of AMLs this past weekend. I did not have access to Silicone so I used black electrical tape instead to encapsulate the whole assembly (battery, base of LED, and leads). It worked great! Very sturdy, excellent switch pressure, a high bounce coefficient, and it even looks purty if you are careful with the tape.
Alternative Encapsulation Method #3: From Ron Schmidt.
Actually, this isn't so much an encapsulation method as much as a completely
different way of approaching the light: "The problem of a switch for the Akerman light can be solved by buying a "U" shaped plastic belt clip found in hardware store. On the bottom side of the "U" drill two small holes (a little larger than the LED leads) the same width apart as the leads on the LED and two more holes in the long sides of the "U" (you may want to drill these at an angle to facilitate threading later). Thread the leads through the bottom (first holes you drilled) then, with a small needle nose pliers, thread each of the leads through the side holes so that you have one lead through each clip, and bend them back towards the bottom of the "U". You can now take the battery and slip it in between the two clips, reversing it when you want it on or off.
Additional Materials Information:
LED: For those who are not familiar with electronics, LED stands for Light Emitting Diode and is pretty much just a tiny semiconductor light bulb. The characteristic that distinguishes it from a light bulb is that it only works in one direction: If you put a voltage (battery) up to it one-way, it lights up. If you turn the battery around, no current can pass and it doesn't light up.
These are most easily available from a local Radio Shack store. The one I recommend is the 3000 mcd red. There are lots of other colors and styles
for you to choose from, depending on your preferences. As far as color, red
is the best choice for someone interested in preserving night vision.
The Radio Shack website lists quite a few of these and will sell them, but it's much easier to compare and contrast if you actually go to a store and hold a few options in your hands. There are other websites and mail order sources for electronics, but I'm not familiar enough with them to make recommendations.
Thanks to Larry Lief for help clarifying LED choices.
3V lithium watch battery: The one I've used in all of my testing is the Radio Shack CR 2032, which is a little larger than a nickel. Any 3V battery will do if you can make the geometry work, however.
Electrical tape: A fresh roll is best, as this stuff gets yucky as it ages.
Duct tape can work also, but is less preferable because it can be so gummy.
Silicone Sealant: Conveniently, Radio Shack sells a product that works just fine for this, so you can buy everything in one place: Archer brand "Silicone Rubber Sealer," 3oz. tube in my case, but that should be enough for about 1000 of these things. That or one light and a half of a bathtub caulking job :-)
Best of luck, everyone!
Caution from James Gibling: The red light worked well for night hiking and preserving night vision. However, we did run into a few minor/humorous setbacks. We started our hike Friday night and while we were still at the trailhead, I checked the map to get an idea which direction we would be heading. The map that I was using had all the trails in red ink (I didn't notice this at the time) so when I used the red light, the trails turned invisible. Also, when I checked the compass, which has a red tip indicating north, it too turned invisible. It wasn't a big deal because there was plenty of moonlight. Then, when we were reading a Forest Service sign at the trailhead, the "Do Not" was in red ink and disappeared as well. The rest of the lettering was in black making the sign read, "Feed the bears, cut switchbacks, leave trash." We were joking that maybe the forest service had a major change in policy. To overcome this problem, I think I will make another mini-light using a low powered white LED (or another color) and use it just for map reading.
From Stuart Bilby:
I recently made two Ackerman Mini-lights and they seem to work well for me.
I used a CR2032 battery.
The first one I made used a 10000 mcd white light with a 20� light cone
angle the second was a green 14000 mcd (at 25 milliamps) LED with a 5�
angle. The 5� is spreading the light over only a quarter of the area so
appears much brighter.
I haven't run the batteries flat yet to see how long I get. A little foil
and electrical tape cover to stop the stray light reflecting in my eyes was
a good improvement and I use a little bulldog paper clip to keep it on when
I don't want to squeeze. The price is good at about US$7 each(NZ$16)
Stu B
Jim Craven's LED light:
Radio Shack 276-307 5mm red LED 1.7 volt (2.4 max), 20 mA, 3000 mcd CR2032
lithium battery
Spray tube from WD-40
Electrical tape
Nylon string, 36 inches, for optional lanyard
What is different about this design is that the light is turned on and off by sliding the LED leads through the tubes. The off position is when the LED is pushed all the way in and the leads do not touch the battery. The on position is when the LED is pulled all the way out so that the leads do touch the battery. This allows the light to stay on without constant squeezing.
Cut two pieces of spray tube whose lengths are 3/4 the diameter of the battery. Tape the two tube pieces on opposite sides of the battery so that the tubes run across the middle of the battery in the same direction. The end of both tubes should line up with the same edge of the battery. Wrap electrical tape around the tubes and battery leaving the tube ends exposed.
Insert the LED leads into the tube ends which line up with the end of the battery. This requires bending the leads near the base of the LED a bit so that the LED can be pushed very close to the battery. The other ends of the leads will emerge from the other end of the tubes. Where each lead extends beyond the battery, bend the end of the lead toward the battery. Then bend the tip of each lead away from the battery.
Adjust the bends in the leads so that when the LED is pushed in the leads do not contact the battery and when the LED is pulled out, the leads do contact the battery.
If you want to hang the light around your neck, add the lanyard while you are taping the tubes to the battery. Wrap the middle of the string around circumference of the battery so that the LED will be pointing down when the light is hanging from your neck. This puts the string between the LED and the battery.
The tape which holds the tubes in place will also hold the string in place. Tie the ends of the string together.
Jim Craven
Free Plastic Bottles
Submitted By Rainmaker
After my page about sanitation and hygiene was posted, I received many questions concerning the plastic bottles I mentioned. I also am frequently asked about bottles I use for alcohol fuel. I rounded up all of them for a photo op, and the photo is shown below. Additional information concerning each bottle is shown below the photo.
I trust these bottles generally not leak in my pack. However, any plastic bottle will leak if it gets squeezed hard enough, and it is best to carry them so that they are upright. To avoid problems, I carry my fuel bottle in a corner of my pack behind the stuff sack that is in the bottom of the pack.
For the smaller bottles, I either place them inside my coffee mug in my pack, or put them in my waist pack. When selecting any bottle to use for backpacking, I always make sure that it contained liquids originally. Generally, these bottles won't leak.
The last 5 bottles on the right below have removable eye-dropper inserts (very handy when measuring stuff by the drop).

("Ounces" mentioned below pertain to fluid ounce capacity, and not the weight of the bottle.)
From left:
12 oz. sports drink bottle. Try to remember the shape of this bottle (and the smaller one next to it). Press on them and you will notice that they are stronger than similar bottles. Generally available in grocery stores and Wal-Marts on the sports drink aisle. These are virtually leak proof and indestructable in normal use. Used for alcohol fuel.
8 oz. sports drink bottle. Same as above, except smaller capacity. Used for alcohol fuel.
1.5 oz. mouthwash bottle. Used for rubbing alcohol, hydrogen peroxide.
2 oz. "Spring Valley" brand Vitamin E bottle. Used for rubbing alcohol, hydrogen peroxide or bleach.
1.75 oz. "Nature's Blend" brand Vitamin E bottle (from Wal-Mart). Used for rubbing alcohol, hydrogen peroxide or bleach.
.5 oz. "Clear Eyes" brand eye wash bottle. Used for bleach.
.5 oz. bottle from Wal-Mart swimming pool test kit. Used for bleach.
.25 oz. breath drops bottle from Dollar Store. Used for breath drops or bleach.
1/8 oz. breath drops bottle from Dollar Store. Used for breath drops or bleach.
(Not shown) 1 oz. Family Dollar "Eye Drops Original" bottle. Used for rubbing alcohol, hydrogen peroxide or bleach. Other eye drops bottles (Visine, etc.) can be used. The very small bottles (1/4 ounce?) containing contact lens cleaning solution are also good.
Tent Pole Alternative
Submitted By Matt Boyd
I did a little experimenting and have found the perfect replacement for tent poles.
I just connected two backpack stays with bolts. My North Face aluminum stays already had one hole drilled near the tip. I drilled second corresponding holes in each stay and bought a couple of bolts from Home Depot. It makes an extremely sturdy pole which is up to 41 1/2 inches long. The total weight for the hand tightening nuts and bolts is 1/2 oz. Lighter weight bolts could also be used. The lightest screw/bolt I tried was a plastic type of dry-wall screw. It's weight doesn't even register on my scale. You can find them easily at any hardware store and they are always bright colors (which will also helps to keep them from getting lost). The dry wall screws hold tight but are harder to get in and out by hand. I drilled small holes in each end of the plastic screws so that a safety pin could be slid through to provide leverage.
If a screw/bolt is ever lost while on the trail, a stick through the hole and duct tape should work just fine.
In the picture shown below, the thumb screws and wing nuts that I used can be seen. An unexpected bonus is that the screws form a nice little place to tie up a small, hanging storage pocket and/or a flashlight.

Here are directions and lessons learned. It's a very simple process of drilling four holes but I know that many people aren't used to doing this sort of thing. You will need a power drill and a set of drill bits. You may also be able to get someone at a hardware store to drill the holes for you:
1. Ensure that your stays can be easily taken in and out of your pack. Maybe consider this when buying a new pack. Then take a look at them and decide if drilling holes in the bottom (and applying some force against the holes) will be something you really want to do.
2. Figure out how long you want the pole/stays to stand once connected. Hold the stays against each other to form that length. They may be curved in such a way that you may need a long bolt to hold them together. I found that the bottom of my stays (where there was already a hole drilled) was the flattest and best place to connect them. Try to connect them so that there is the least amount of bend out from center. The further they bow out from the center the less sturdy they will be.
3. Find whatever kind of screw or bolt you want to use to connect the stays. Do this before drilling the holes so that you can choose the best hole size (the smaller the better). I chose thumb screws and wing nuts because they can easily be attached firmly and quickly even while wearing gloves or with numb/tired hands at night.
4. Drill the holes:
- First, mark where you want the first holes.
- Clamp down one stay to something solid and be sure that the drill won't go into somthing else below your stay (like your hard-wood floor).
- Then drill the first hole into each stay. You probably don't want to have holes too close to the end of the stays if they aren't metal.
- Connect the two stays and check to see if the height/length is correct. There is no sense in drilling matching holes if it's not the right length. Drill another hole if necessary to get the height correct.
- Next, drill the second hole into ONE stay only. Don't drill the second hole into the second stay until you have connected the two stays. This will ensure that the holes are lined up just right.
- Connect the two stays tighly through the first hole. Clamp the two stays together and drill the final hole through the second hole already drilled. Now you should have four matching holes. If you want to be able to adjust the height, more holes can be drilled in the same way. Just always be sure to attach the stays before drilling the matching holes.
Since you have the drill out, now might be a good time to drill holes in anything else where you need guy wires or just to lighten weight in bulky items.
If you have any questions or comments about this, you can send an e-mail to me.
- - Matt Boyd
Milk Jug Sink
Submitted By Rainmaker
I rescued a discarded one gallon milk jug from a trash can in South Lake Tahoe, CA in 2000 while hiking the PCT. I washed it out and cut it down to make a small sink. I carried it with me all the way to the Canadian border over the course of the next 2 summers. In fact, I'm still using it.
I was able to cut it to the desired height with my knife. It weighs only an ounce or two, and this type plastic is very durable. As an added benefit, my clothes bag fits inside the milk jug sink, so I was able to carry it inside my pack. In the evenings, I'd use a small bandana and my little sink for sponge baths, weather permitting. It is truly amazing the amount of trail dirt that can be removed using a small cloth and a few ounces of water.
Homemade Ultralight Cup
Submitted By Brawny
A soda bottle can be cut to nest within your cooking pot. It makes a great cup and bowl, and it will hold boiling water. However, it does shrink the first time, and the top may distort . To prevent the distortion, first wrap some duct tape around the rim. Add your boiling water, and the soda bottle "cup" will shrink somewhat. Be sure to make it about 1/2 inch taller than desired. You can trim off any excess height after it shrinks.
Thrift Store Clothing
Submitted By Brawny
Several types of clothing commonly used by backpackers may be found at thrift stores and second hand stores. I bought a pair of nylon shorts at a thrift store which made nearly 2000 miles on the PCT. I sewed a silnylon pocket onto the front, which was used for wallet, and trail maps. They weighed only two ounces, had side pockets as well, and cost me 50 cents.
Rainmaker found a pair of Feathered Friends polar fleece pants in very good condition for $2 at one of these stores. Originally, they probably sold for at least $60.
Most thrift stores occasionally get high quality clothing suitable for outdoor use, and it seems that they don't realize what they have. Consequently, some great bargains can be found.
Additional Information Received From David Crane:
Don't forget to check out the Women's
clothing sections. Many "fuzzy" tops are missorted into the women's
sweaters. Many (Men's) high-tech and expensive winter-weight, form-fitting,
running pants end up hanging with women's leotards, sturrip pants, and
tights.
They don't know what Gore-Tex is.
I've been saying that I could outfit myself with all the clothes I would
need for a hike for $30.00. This year my father (6' 2" - everything Extra
Large) has agreed to do a section of the AT with me. Over the course of a
week and using three different thrift stores we outfitted him for $28.00 +
tax. This gear will be sufficient for him in temperatures down to 30 degrees (in camp).
This included:
Wool Nike Air Ball Cap
Thinsulate/Acrylic watch cap
Microfleece tights
Nylon shorts
Fleece pants
Zip-leg nylon shell pants
In-Sport Long-sleeved Runner's Top
Two fleece pull-over sweaters, one 100 weight, one 200 weight
Nylon shell jacket with elastic cuffs and drawstring hem (with hood in
collar)
ECW heavy polypro long underwear
This stuff is in great shape too! Unbelievable!
But you have to be willing to check out the racks in the Women's section!!!! Fully half this stuff came out of the Women's section, but all of it except the Microfleece tights were Men's!
Plastic Peanut Butter Jar
Submitted By Brawny
A plastic peanut butter jar (large or small size) weighs only a couple of ounces and makes a
wonderful coffee cup, breakfast cereal bowl, and
instant pudding shaker. I put boiling water into my
empty Wal-Mart PNB jar, and it held up fine, no
distortion at all. The lid becomes a spoon holder, or
vitamin holder, while you cook supper and sip hot
coffee. It can be used to carry items like toothpaste
and toothbrush, or instant coffee in a ziplock bag. A plastic PNB jar can be used to carry jelly and jam; just empty the jelly or jam out of its glass jar, and put it in the plastic PNB jar.
Stove Kit
Submitted By Leslie Booher (Anklebear)
I use a 1 lb. coffee can (of course, we all know that 1 lb. of coffee these
days is really only 13 oz., but who's quibbling?) as my pot. It holds the
wind screen, an alcohol stove made of soup cans, two 4 oz. bottles of fuel,
a pot gripper, lighter, etc. I snap the plastic coffee can lid on the
whole thing. It carries wonderfully that way, and everything's there.
Windbreaker Parka
Submitted By Rainmaker
I'm not a real big fan of Gore-Tex. Its expensive, and it doesn't work as well as advertised (in my opinion). For instance, if rain is hitting the parka, and exerting more force than the body moisture which is trying to get out, the body moisture can't get out. It will then build up on the underside of the fabric.
Anyway, one day it occurred to me that it is still possible to survive in the wild without Gore-Tex. I purchased an uninsulated, coated, nylon parka from Campmor for about $25. I used it in 1999, 2000 and 2001 while hiking from Mexico to Canada on the Pacific Crest Trail. Used in conjunction with a wicking layer of Thermax, and an insulating layer of fleece, I have been warm and relatively dry. Nylon is about 90% wind proof because of its tight weave. Paying extra for Gore-Tex is not going to improve windproofing at all.
My windbreaker parka, in size large, weighs about 8 ounces. It provides a weight savings of about a half pound over a regular Gore-Tex parka, and a monetary savings of at least $150.
Wally-World (Wal-Mart) Items
Submitted By Rainmaker
Okay; granted Wal-Mart isn't REI or Campmor. However, most Wal-Mart stores stock some items that are of interest to hikers. If you can't find these items at Wal-Mart, you might want to check at other discount stores like K-Mart. These are the items that I have bought and used:
Grease Pot (Used As Cooking Pot)
These are found in the Kitchen Wares area and as the name implies, they are made to be used as a receptacle for cooking grease. However, they are made of aluminum, have a tight fitting lid and are very light. They are about 5 1/2 inches in diameter, 3 1/4 inches high and hold about a quart of liquids. After removing the grease strainer, it weighs in at 3.5 ounces. This is about an ounce lighter than the "tin can" pot I used in 2000 on the PCT. Mine cost about $6.50.
Teva-Type Sandals
I bought some Teva sandals a few years ago from an outfitter, and planned to take them on the trail as camp / town shoes. However, the things weighed over a pound and a half. I wear them around the house, but they haven't gone on too many backpacking trips.
Two years ago, I took a chance on a pair of Teva-knock offs from Wal-Mart. They cost $10 and weigh 8 ounces in size 13. I have used the same pair of Wal-Mart sandals the last 2 years on the PCT, and have had no problems with them at all. Brawny also bought a pair to use on the PCT this year, and her's weigh about 6 ounces in size 6 - 7. She didn't have any problems with her sandals, either.
If you want to save over a pound of weight and perhaps $40 - $50, consider using a pair for camp and town use and water crossings.
Nylon Liner Socks
I have used nylon socks from Wal-Mart for the last two years of hiking on the PCT, and I've been very pleased with them. I believe that these socks are intended to be used as men's dress socks (does anyone around here wear suits???), but they work well as liner socks. In warm weather, they are the only socks that I wear.
They come in a couple of different colors (black and beige and perhaps others) and cost about $3 for a 3-pack. I usually get between 300 and 400 miles out of a pair and they can be worn in the place of more expensive liner socks. They are light, comfortable, durable and dry quickly. And thats about all you can ask from a pair of liner socks.
Hiking Socks
These are seasonal items, usually available in fall and winter in either the Men's or Sporting Goods Departments.
The socks I've used are comparable to Thor-Lo Hiking Socks. The blend of material is almost exactly the same, and so is the extra cushioning in the toe and heel areas. They are very comfortable and durable. I have used Thor-Lo Hiking Socks for years, but after trying the Wal-Mart knock off version, I've stopped buying Thor-Lo's. In fact, I like them a bit better than the Thor-Lo's.
Price is the main difference. The Wal-Mart version costs just under $5, or less than half the cost of Thor-Lo socks.
Flashlights
Wal-Mart sells a two cell flashlight that uses AA size batteries that seems to be durable, lightweight and inexpensive. They are usually found on a wall rack in the sporting goods department. There are a couple of different models, my favorite is the hard plastic Dorcy model.
This flashlight costs only about $2.50, and weighs about an ounce without batteries. I bought several a couple of years ago, and have had no problems with them. The flashlight is pretty basic; comes with just a simple on / off switch and a fold-out hanging ring. When carrying any flashlight in the outdoors, I usually reverse the batteries during the day, to keep the light from coming on inside my pack.
Fleece Jackets
I have bought several polar fleece jackets from Wal-Mart. After seeing them priced at $45 - $60 at outfitter stores for years, I have problems passing them up at Wal-Mart for $18.
These are seasonal items, and are usually found in the Men's Department. The material that is used is the approximate equivalent of 200 (medium) weight fleece. Except for the very shallow pockets, I feel that they are comparable in quality and workmanship to the more expensive versions sold elsewhere.
I've noticed that the Wal-Mart fleece jackets have a fuller cut than those found at outfitter's. They tend to fit a bit "loose", and you may be able to get by with a size smaller than your usual size. Since more material apparently is used in the Wal-Mart jackets, they usually weigh a bit more than the more expensive models found elsewhere.
Nylon Shorts
These are seasonal items found in the Men's Department, and perhaps the Women's Department as well. These lightweight shorts are ideal for wearing in hot weather, and can also be worn over long underwear while hiking in cold weather.
The usually have an elastic top, a mesh brief and sometimes a small pocket. They seem durable enough; I bought 2 pair in PA during my 1992 AT thru-hike. Not only did they finish the hike, but I'm still using them.
They weigh only a few ounces. Cost seems to be the main difference; these are only $10 - $12, about half of what they sell for in outfitter's stores.
*****Vinky Stove*****
Submitted By Rainmaker
This is a variation of the "World's Lightest Stove" also described on this page.
The name I gave this stove comes from a derivative of the Yahoo ID's of two guys in AT TrailChat who gave me the idea. Swinky mentioned driving 3 tent-stakes in the ground, and using it as a pot support. Viking mentioned the tea-candle cup stove. Put them together, and the Vinky stove was born.
There are several alternatives that are possible, however, regardless of the configuration, you will need 3 metal tent stakes to use for a pot support. Drive 3 tent stakes in the ground to a point where they are sticking out of the ground about 2 - 2 1/2 inches. Getting them the same height and the right distance apart will require some trial and error. "Level" them by putting your pot on top of them, and lowering / raising a stake or two until the pot sits level. It is best to do this BEFORE you fire up your stove (I learned the hard way, but the burn on my finger has now healed). If you are going to burn alcohol, you'll need something to hold the liquid fuel. A metal mayonaisse jar lid will work; so will the little tea-candle cups described in "World's Lightest Stove" on this page. If you are using a hexamine or Esbit fuel tablet, it can sit directly on the ground. Add some folded aluminum foil as a windscreen, and you are all set.
Depending on how this stove is configured, it will weigh 1.5 - 2.5 ounces. Not bad at all.
*****World's Lightest Stove*****
Submitted By Rainmaker
"World's Lightest" is a hard claim to live up to in the world of long distance hikers. However, I think I'm safe with this one. Know the little tin cups that tea-candles come in? I think they are about 10 for a $1 at the Dollar Store. They are also known as food warmer candles. Anyway, take out the candle, and retain the little tin cup. Fill this little jewel with denatured alcohol (isopropyl alcohol will work, but the fumes are awful, and there is smoke and soot), and it will burn about 10 minutes. Thats long enough for a hot beverage, or a Ramen dinner.
The weight of this "stove" is about 1/16 of an ounce. Use rocks to support the pot. Use some aluminum foil as as a windscreen, and you are all set.
If you are concerned about durability, take one of the little cups and crush it in your hand. When you are done, you can unfold it, and it will work.
This little "cup stove" can replace an expensive alcohol or "flame-jet" white gas model weighing anywhere from 8 ounces to 2 pounds, and costing $30 - $90.
Additional Information Received From David Crane:
This is in regard to using "The World's Lightest Stove" in the winter. I cook in a cheap 1 1/2 quart aluminum pot with a lid because I am usually cooking for two people. (I actually use a one ounce stainless steel coffee scoop, which is basically the same size as the tea candle base, but is more robust, and is still less than half an ounce. Measured performance [burn time / fuel volume & heat output] is basically identical.)
While I have always enjoyed the fact that this type of stove allows me more time to complete other mealtime cooking chores while waiting for the food to cook than the "boil-a-quart-in-4-minutes" stoves and avoids the danger of overheating as well, I have found that in extreme cold weather conditions, my large aluminum pot is loosing heat off the top relatively close to the rate at which is is being added down below. Cooking still occurs, but some types of noodles (tortellini) and other foods don't cook thoroughly enough with a long slow burn as they do with a shorter, more intense burn. And this is the case even with a good windscreen in use.
I have experimented with many methods of "Supercharging" this stove. I have put two tea candle bases together in a pop-can stove configuration - functional, but too delicate. One of the most impressive iterations was to fold a 2" x 8" strip of regular aluminum foil down the middle long ways. With a pin, poke a row of holes every 1/2" along the fold. Bend over and fold flat 1/8" at each end of the folded strip of foil. Then coil the whole thing up around a pencil. Remove the pencil and tighten the inside of the coil and loosen the outside of the coil so that the coil forms a spiral that fits inside the tea candle base. Remove the foil coil from the tea candle base and with a stick pin or pencil tip spread the two halves of the folded aluminum. When done properly, you should not be able to look "through" the coil because the bottom flair has eliminated the spaces between the loops of the spiral. The view from the top of the coil will be a spiral ridge with pin holes in it.
Fill the tea candle base 3/4 full of denatured alcohol and set the foil coil into the base - pin holes up. Flick your bic! The heat from the lighter will cause ignition the exposed alcohol and the thin foil will almost as instantly begin boiling off the alcohol trapped inside inverted "V" of the folded and spread foil. The alcohol gas will spurt out of the pinholes where it ignites and forms a gas jet almost as good as the pop-can stove. This will consume your fuel more than twice as fast as the regular tea candle stove, and at almost no additional weight. The down side is that construction using thin aluminum foil is tedious, the end result is very fragile, and the intense heat may (over several burnings) degrade (melt) the foil. Beside you can achieve almost the same results with other bomb-proof methods. But this is by far the most cool looking.
The other approach is to boil off alcohol gas by directly transferring heat from the flame down into the liquid alcohol. A 3/4" diameter coil of thin, stiff, picture hanging wire laid on its side inside the tea candle base will do this. The flame from the burning alcohol heats the portion of the coil above the surface of the liquid alcohol. This heat is quickly conducted through the wire down into the liquid causing localized boiling of the alcohol. The addition of the alcohol gas's burning just about doubles the size of the flame generated.
Even more simple and almost as effective is a simple 1 1/2" aluminum roofing nail (aluminum siding nail). I nipped the tip of mine for safety. Stand it on its head inside the tea candle base. When lit, the top part is in the flame. The shaft and nail head boil off alcohol so fast the the nail does a little dance. These heat transfer methods almost doubles the heat output and consumes your fuel in half the time as the basic tea candle stove. A word of CAUTION!!! When using any of these methods of "supercharging" it is not uncommon to see a miniscule drop of liquid alcohol splash from the boiling surface of the liquid. However, these are very very small, and are consumed in the air before they even reach the apex of their trajectory. They are NEVER seen when a pot is on the flame and only showed up during burn tests. I have never seen one go higher than two inches. BUT YOU NEVER KNOW! So let the experimenter beware!
My goal is to heat the pot, not to shoot (waste) flame up the side of the pot. And with these larger flames the wind can cause that. Thus, my wind compensator flame-thrower unit. This is simply a .44 Magnum pistol bullet case. (Note: This is an EMPTY case! No bullet, no powder, spent primer - just a spent, empty, INERT, brass case!) Drill a 1/8" hole into the side of the case just above the base. The bullet must be made inert by firing the bullet in a gun BEFORE you drill it!!! You should end up with a miniature brass cup with a hole in the side at the bottom. Turn this upside down (base/rim up, mouth down) in your tea candle base. As the fuel burns, the upper part of the case heats up and the lower part begins boiling off alcohol. The gas vapors that boil off INSIDE the case shoots out the hole in the side of the case where it ignites and throws a flame out from one to two inches.
It seems that no matter how I position my wind screen, the flame always heats one side better than another. With this case in the stove, I turn the case to shoot its jet into the wind and get a better spread of heat across the bottom of my pot. (Safety tip use your leatherman to turn the case, NOT your fingers.) Keep in mind that alcohol gas is also being generated on the outside of the case and this whole arrangement burns fuel twice as fast as the basic tea candle stove.
Then there are the little toy hats. Make an aluminum foil "top hat". The outside edge of the brim should fit down inside the tea candle base. Make 4 - 6 pin holes around the sides of the crown at the top. A little flame shoots out each hole, but not a far as in a pop-can stove. Experiment with the width of the "brim". Too narrow and the flame has a hard time "holding on".
Do the same thing with a "dunce cap" aluminum cone. The big end of the cone should fit inside the tea candle base with a little room to spare. Make 4 -6 pin holes around the sides near the top. Similar results as the "top hat", but with a tighter circle of jets.
With all of these inserts, be careful that they not fit so tight nor that there be so few holes that pressure builds up inside. My first attempt at inverting one tea candle base into another one in the pop-can stove configuration resulted in the forceful flaming ejection of the inside (upside down) one. Had this experiment been done inside a tent/tarp, there would be a hole in my tent floor/ground cloth if not the "ceiling" as well.
The different things that can be put into a tea candle stove to change the operation characteristics is limited only by your imagination. Experimentation is fun and relatively safe if you have (the increasingly rare) common sense. Please share your results.
Have fun.
Never take cooking or stove advise from a man with no eyebrows!
;-)
(Note From Rainmaker: I still have all my eyebrows, but only because they grow back!)
*****Soda Bottles*****
Submitted By Rainmaker
Lightweight, plastic soda bottles (24 oz. and 1 liter sizes) can be used as water bottles, and they are about as cheap as it gets. Hey, they're free! Just enjoy your favorite beverage, and don't recycle the bottle. Wash it out, and put it in your pack instead. These bottles are very tough and durable, and they weigh about an ounce. One of mine has not only survived 1,800 miles of hiking on the PCT over a two year period, but 2 trans-continental airline flights as well. And its going back to the PCT next year.
"Yuppie" water bottles (Evian, and the like) are just as good, and come in 1.5 liter sizes. They weigh about an ounce and a half.
These bottles generally will not leak if they are carried in the upright position. Compare these to other bottles that weigh about 6 ounces and cost $6 each.
Additional information received from David Spellman:
Someone pointed out to me that the plastic Gatorade bottles are
actually stronger than (while remaining pretty much as light as) soda
bottles. Soda manufacturers pressurize their bottles to make them pretty
solid for shipping, and that pressurization takes the place of
structural plastic. It also maintains the carbonation so that you get a
lot of fizz when you open them. That's what makes them so light.
Gatorade, on the other hand, isn't carbonated, and isn't shipped with
pressurization, so their bottles need to be a little stronger. Seems to
me you get a wider lid on some of the Gatorade bottles as well.
Additional information received from Paul McLaughlin:
Along with the soda bottles and Gatorade bottles, you'll also find that cooking oil is being packaged in bottles made from the same sort of plastic. Like the gatorade bottles, you get a little bit wider mouth, which is nice if you like to mix anything with your water. They come in various shapes depending on brand, some of which pack more conveniently than plain old round, or various sizes.
